How To Use The Google Tag Manager To Track Video Views on Your Landing Pages

Creating a powerful, high-performance landing page is a process that takes time, testing, and a lot of attention to detail.
Tons of sites use landing pages, but each one is a little bit different.
There are plenty of resources that you can choose from to help you customize your landing page and sell effectively.
One valuable resource that you should consider incorporating is the landing page video.
But because a landing page lacks the native tracking you find on YouTube or a social media site, it can be difficult to know just how well your video is performing.
In these instances, it pays to turn to Google Tag Manager to track your video and look at accurate analytics.
In the closing months of 2017, Google Tag Manager released an update that allows businesses to track video metrics.
So, in this article, I’ll walk you through a process that will allow you to track video views on landing pages with Google Tag Manager.
But before you dive into setting everything up, let me show you how much of a difference landing page videos can make for your brand.
The importance of video on a landing page
You may be surprised to learn that adding video to your landing page could be one of the most lucrative moves you make this year.
Even if you already have a video marketing campaign in place, you should consider adding a video to your website’s landing pages.
Just consider all of the various purposes you can create a video for.
Then, think about what you’re trying to accomplish with the copy and imagery on an existing landing page. You’ll likely find that a video could accomplish the same purposes.
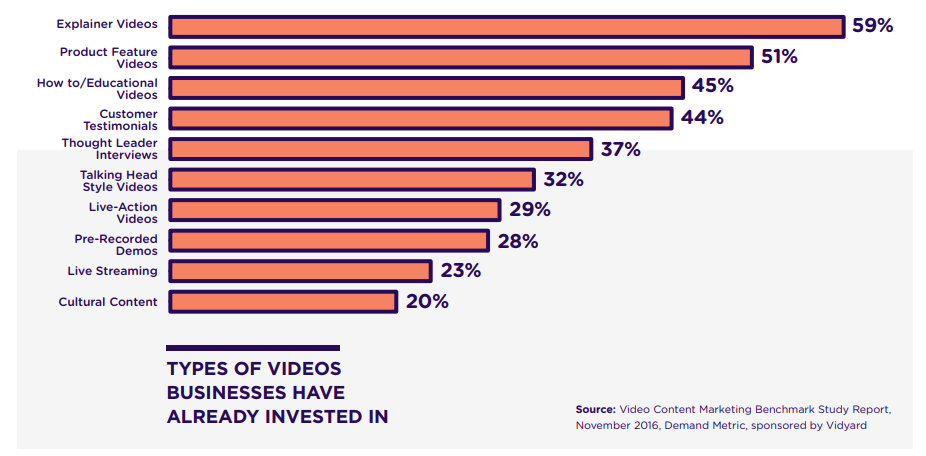
Videos that explain a process, show off your product, provide a testimonial, or educate your visitors are perfect subjects for landing page elements.
They can act as substitutes for large blocks of copy. Or, you can purposefully use them as the centerpiece of your sales pitch.
And since the majority of business-related videos already fall into those categories, it’s very possible you already have a video you could use.
There’s just a good chance you’ve published that video somewhere else.
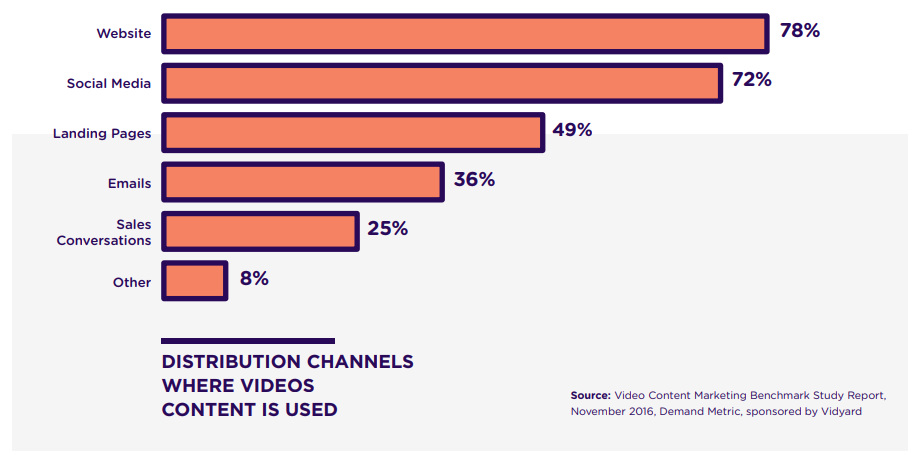
At this point, less than half of businesses are publishing video on their landing pages. Instead, they’re putting them on social media or dedicated places on their websites.
But when you dig a little and discover the benefits of using video on landing pages, it’s difficult to understand why so few businesses are utilizing them there.
According to a study from Wyzowl, there are some very compelling reasons to consider dedicating a video to a landing page:
- 97% of marketers say that a video has helped them increase a buyer’s knowledge of their product or service.
- 76% say it helped them increase sales.
- 81% of consumers have watched a brand’s video and decided to buy a product or service because of it.
And when you consider the fact that studies have shown that too much text can drive users away, the case for using video becomes that much stronger.

So why would a brand choose to leave such a powerful asset out of a high-stakes landing page?
There’s a good chance that many businesses already have a video they could use, and marketers have already proven the effectiveness of video in digital marketing.
On top of all that, visitors retain far more information when they watch a video than when they simply read it.

If you want to stand out, you need your website’s visitors to retain more than 10% of the information they read.
So adding a video to a landing page can skyrocket the probability that your brand will stand out even if the user doesn’t buy on their first visit.
And if that visitor doesn’t buy from you, it’s 12 times more likely that they will voluntarily share your landing page if you include a video on it. That might bring another visitor to your landing page who will buy from you.
Thankfully, it’s not too difficult to add a video to a landing page. You just want to make sure that you do so tactfully.
In our primer on landing page design, we show you how a video can act as the centerpiece of your audience’s attention.
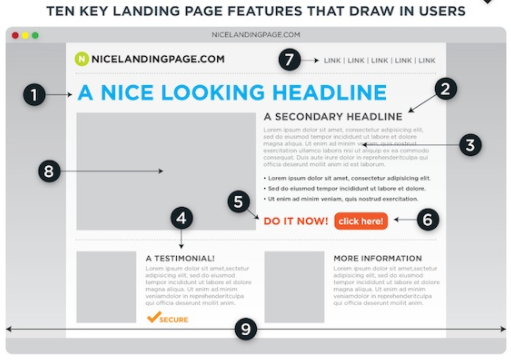
It can add to the overall effect of your landing page without detracting from any other important elements like CTAs or testimonials.
As long as you use a video that closely relates to the copy, then you’re on the right track.
You can also consider giving a motivational speech or sharing testimonials to help give your visitor that extra push.
Whatever video you use, be sure to test it and ensure that it’s having a positive impact.
And above all else, you need to be tracking your video’s performance.
According to the Vidyard Video Content Benchmark Report, only 42% of brands are using “basic” measurements for their content.
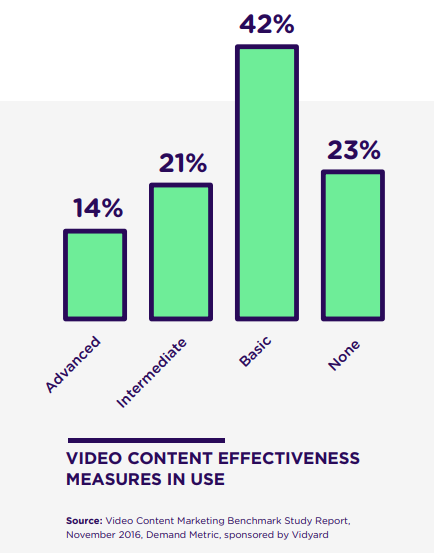
While they don’t specify what they mean by “basic” measurements, it’s likely that these brands are just counting the overall page views and click-throughs without accurately attributing any success to their videos.
For example, they may have tested their landing pages and seen that their page views increased when they added a video. That’s a helpful starting point, but how do they determine whether their visitors were watching some of the video or all of it?
In scenarios like this, the majority of brands don’t know whether people really watch their landing page videos.
And since videos on landing pages can convert like crazy, not knowing is a bit of a problem.
So, in order to move beyond the basics, you’ll need to turn to Google Tag Manager and start tracking specific actions on your pages.
While this approach is technical, it allows you to create accurate analytics to help you test and improve your landing pages in the long run.
Let’s dive into Google Tag Manager, and I’ll show you how it works.
How Google Tag Manager works
At first glance, Google Tag Manager can be a little confusing.
Thankfully, Google has created a quick video that covers most of the basics about how this platform helps you.
In short, Google Tag Manager helps you manage how you use “tags” on your site.
These tags are simple bits of HTML code that send information from your site to a third party.

In this case, we’ll be using Google Tag Manager to send information from your landing page to Google Analytics.
This will help you determine how often your visitors play a video on your landing page.
And since Google is fairly detail-oriented, they do most of the heavy lifting for you.
All you need to do is set everything up, install some code, and set up the tag you want to use.
When you install the code and set up your tag, you’ll be using a data layer to track actions on your site.
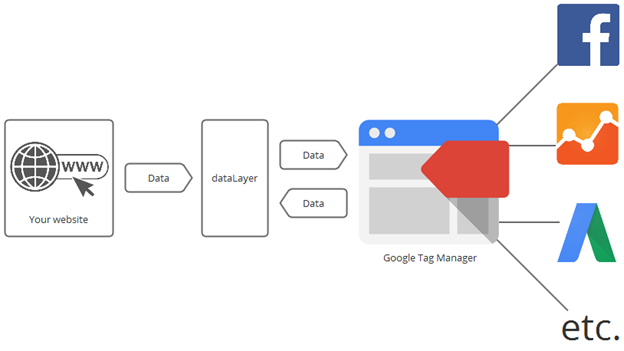
The data layer, or data layering, is how Google Tag Manager communicates back and forth with your website.
This virtual layer uses a JavaScript object or another piece of code to collect and send various data points when a user meets the conditions you set.
If you set everything up correctly, you’ll be able to track video views and optimize your landing pages.
Now that you know a bit more about the technical, behind-the-scenes mechanics of Google Tag Manager, I want to walk you through how to track video views on a landing page.
To start things off, you’ll need to install it properly.
Step #1: Install Google Tag Manager
Like most things on the Internet, getting started with Google Tag Manager will require you to sign up.
Even if you already have Google Analytics, you’ll need to create a free account with Google Tag Manager as well.

The process is fairly simple.
Just add an account name and then click through to phase two.
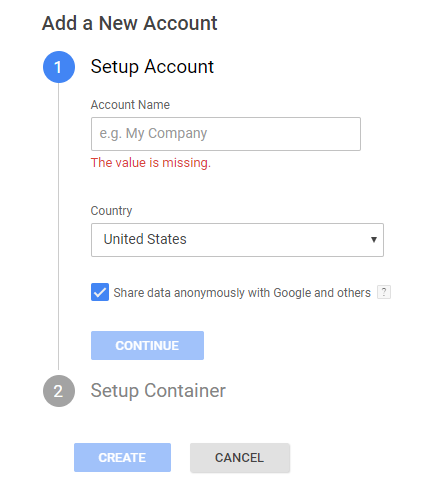
Google Tag Manager starts to use a little jargon here, but don’t be too concerned.
It will ask you to insert your website’s URL and select a “container” for your site.
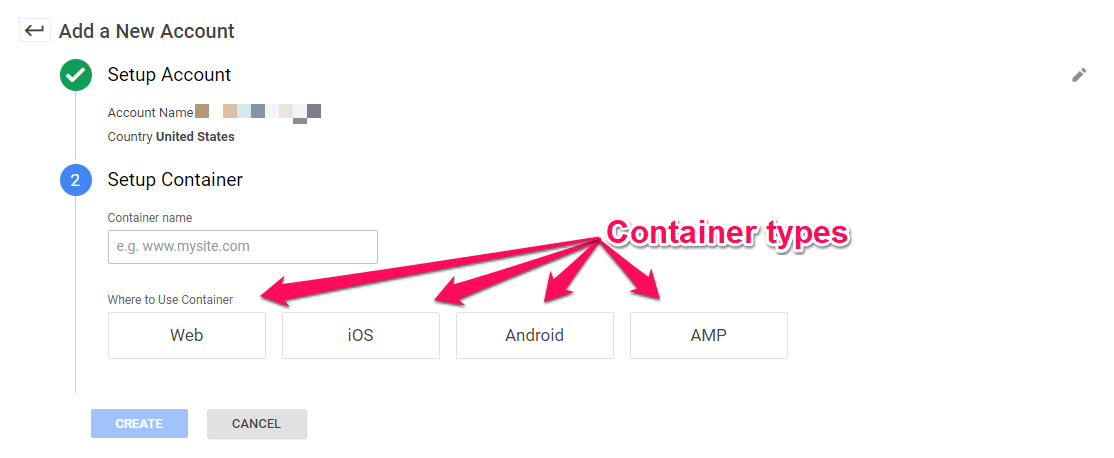
Containers are the way that Google Tag Manager “holds” tags on this platform. They’re like a giant bucket.
You can create tags for a variety of different purposes on the Internet, so Google allows you quite a bit of flexibility with this platform.
In this instance, since we’re attempting to track an element of your website, you’ll want to select the “Web” option.
Once you finish creating your new container, Google Tag Manager will give you a big chunk of code to add to your site.

You’ll need to add this to your source code for every page you want to use tags on.
The top section of code goes in the <head> section, and the bottom will go at the very top of the <body> section.
If you use a content management service like WordPress, you can also find a plugin like these two from DuracellTomi and George Stephanis.
These will help you install this code safely if you’re worried about doing it yourself.
And if you had someone build your site for you, you may need to contact your web developer and have them install it.
Once you have everything installed correctly, you’ll be able to add, edit, and manage your tags.
And at this point, you should also have access to your Google Tag Manager workstation, which is where the magic happens.
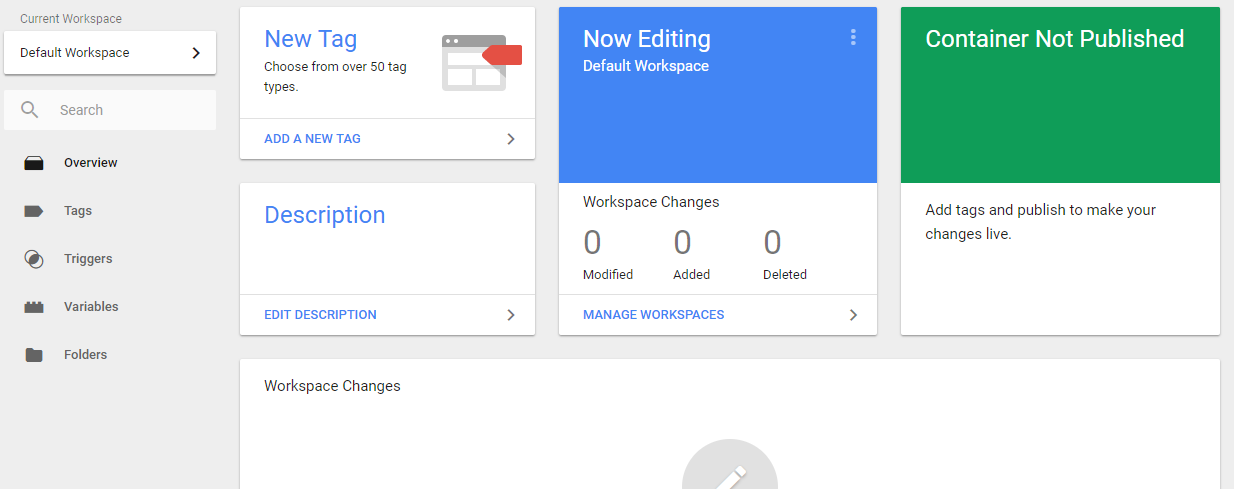
Once you’re here, it’s time to move on to some of the more technical elements of setting up your tags and tracking your landing page videos.
Step #2: Set up variables and triggers for video
At this point, there are multiple ways you can set up all of the various elements of your Google Tags.
But to keep things simple, I’ll walk you through each element and help you understand what each part does.
First of all, you’ll want to tackle the “Triggers” section.
Think of triggers like a tripwire.
When a user comes to your landing page and clicks on your video, the trigger tells Google Tag Manager that someone has carried out an action worth tracking.
In order to function, all tags have to have a trigger assigned to them.
And in the case of video, most experts recommended that you have two triggers.
One trigger will tell you how many times visitors started viewing a video, and the other will be able to tell you when they watch a certain amount of your video.
This will give you a fuller picture of how your video performs.
Start by clicking on the “Triggers” section of your dashboard.

Click to create a new trigger, and then you’ll need to decide which element you want your trigger to track.
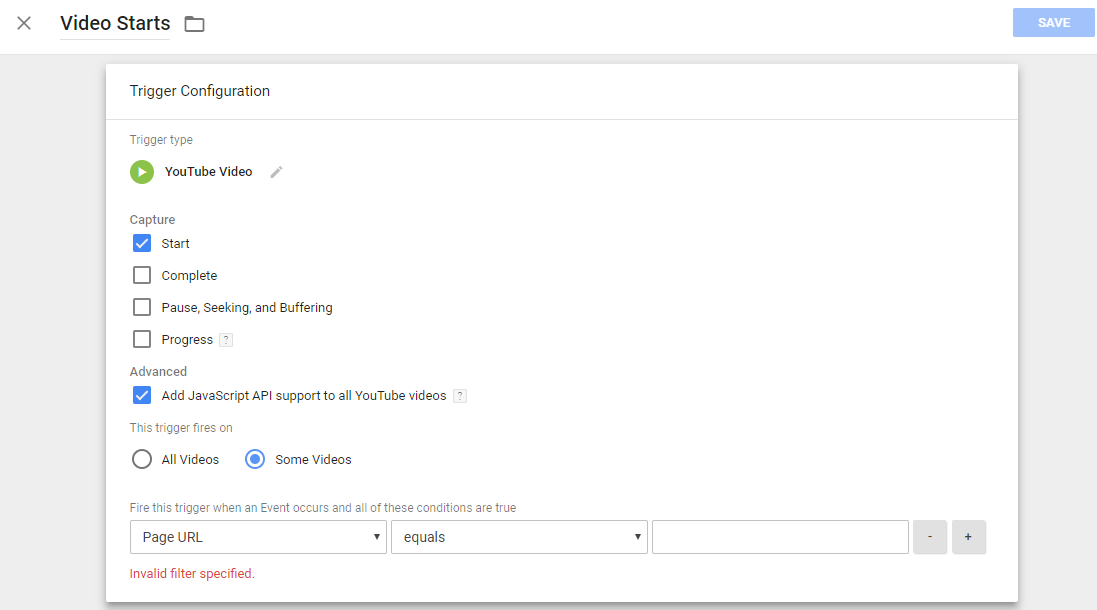
As you can see above, I’ve selected “YouTube Video” for my trigger type, and I’ve configured the trigger to only capture when the video starts.
You’ll also want to make sure that you select the “Some Videos” option and input the specific URL you want this trigger to track.
Otherwise, the trigger could go off any time someone plays any video on your site. That would give you an overinflated number for your landing page and ultimately be useless.
Rename and save your first trigger, and then move on to the second one if you want to track how far users get into your video.
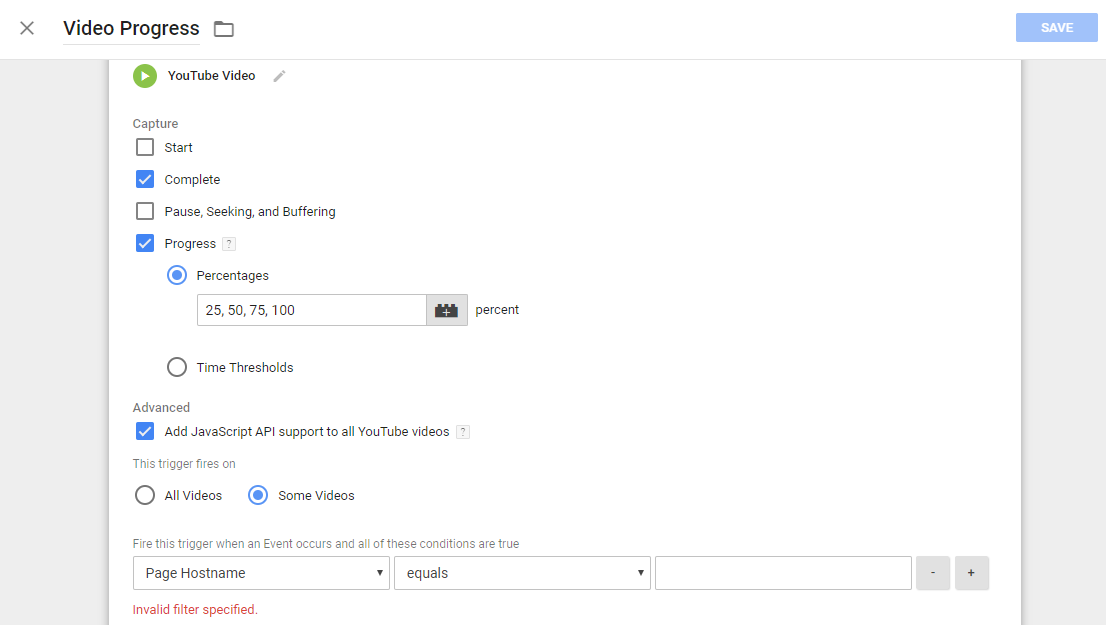
In this instance, I’ve deselected the “Start” capture and instead selected the “Complete” and “Progress” options.
I’ve also included which percentages should activate a trigger, thus providing a hit through Google Tag Manager.
When you combine these two triggers, they can tell you how often users start a video and how far they get before they take an action.
You can use this information to more accurately ascribe bounces or conversions to your landing page video.
But before you can do that, you’ll need to set up Google Tag Manager’s variables to allow for video.
Once again, you can think of variables like tripwires for triggers.
I know that’s a lot of tripwires, but variables are what set the parameters that allow triggers to “see” the actions of your users and know if they should fire an alert.
Your tag will use the defined variables to double-check your trigger. If a user meets the conditions, the tag will fire.
In this way, setting up your variables is very similar to setting up triggers.
Go to the “Variables” tab and select the “configure” option.
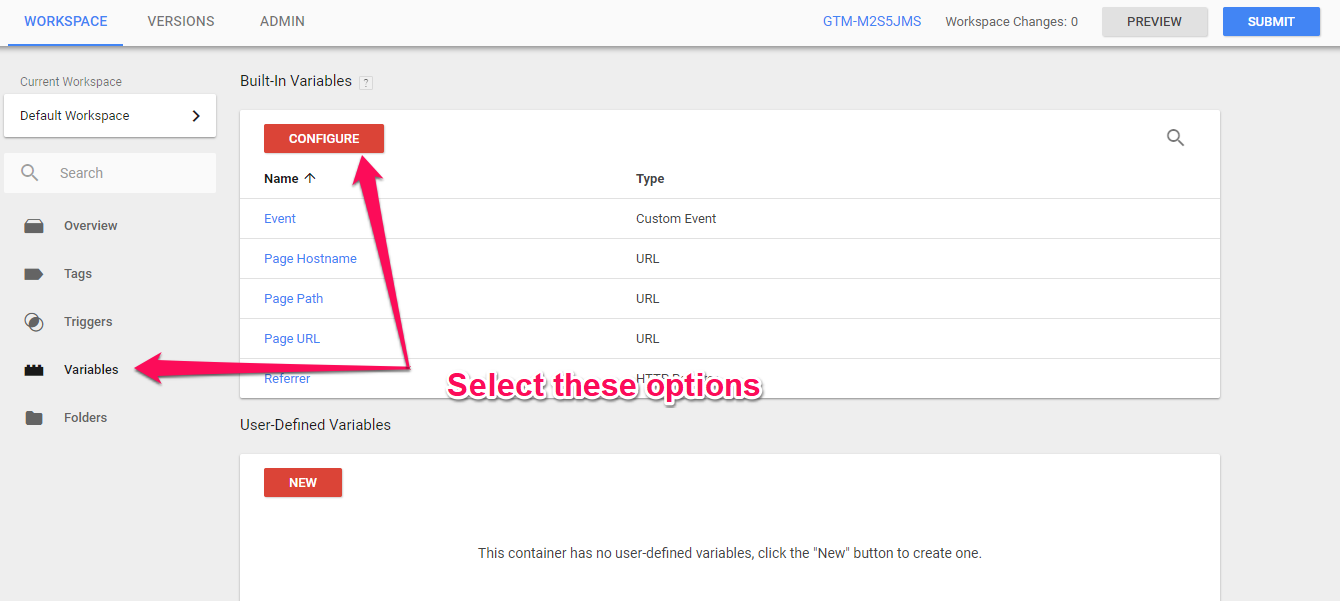
At this point, you’ll need to scroll down quite a bit until you reach the “video” section.
Google unselects all of these options by default, so you’ll need to go ahead and activate all of them.
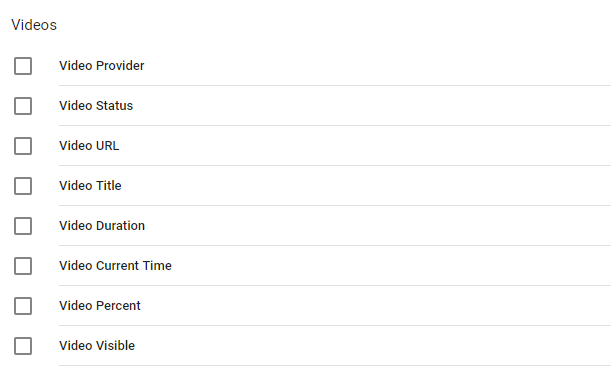
Here’s a breakdown of what these variables allow Google Tag Manager to see and do:
- Video provider – Sees where you are hosting your video (YouTube, Vimeo, etc.)
- Video status – Allows you to track video starts, pauses, and stops
- Video URL – Allows tracking of the URL where you host the video from
- Video title – Tracks the meta title of your video
- Video duration – Tracks the total length of your video
- Video current time – Gives an exact timestamp of where in the video a trigger fires
- Video percent – Allows you to set a certain percentage for when your trigger fires
- Video visible – A true/false variable that lets the system know if your video is visible on the screen
Once you’ve selected them, all you have to do is click out of the selection menu and back to your dashboard.
At this point, you’ve set up most of the elements you need in order to utilize Google Tag Manager on your landing page.
All you have to do now is finalize the process and get it running.
Step #3: Finalize your tag
Go back to your main dashboard and find the option that looks like this:
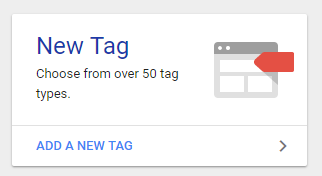
This will be the final step that allows you to track your video views on your site.
You’ll need to set up two different elements: Tag Configuration and Triggering.
Since we’ve already set up triggers, this step should be fairly simple.
Start by clicking on the “Tag Configuration” option.
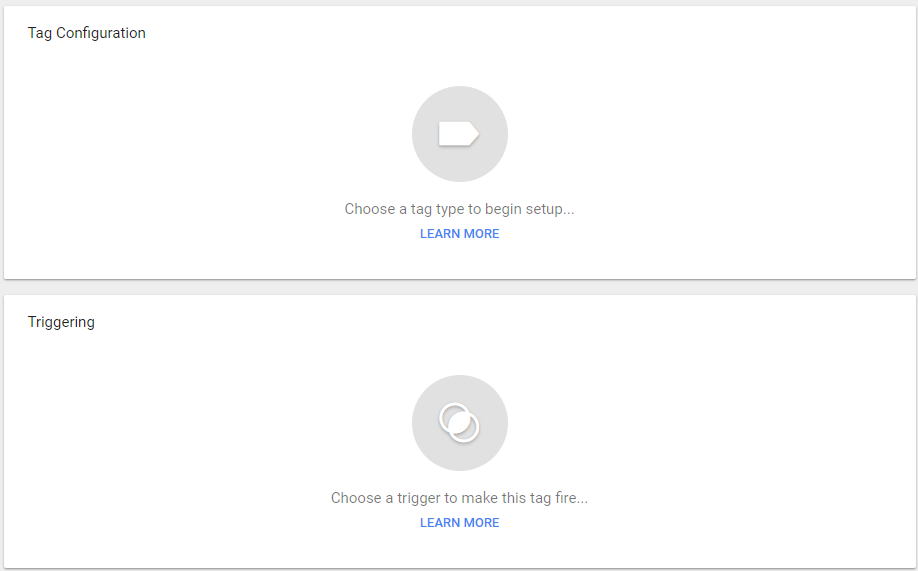
A menu will appear that has a variety of tag types.
If you’re new to Google Tag Manager, the options on this menu can be overwhelming.
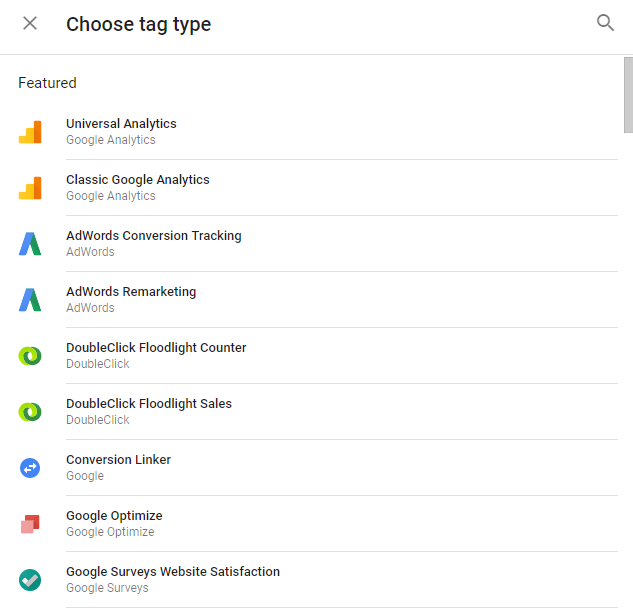
Google Tag Manager works with dozens of different platforms to let you create and use tags for a variety of purposes.
There are even tags for Crazy Egg, LinkedIn Insights, and Oktopost.
There more than 50 tag types and the list may even grow over time as more innovative marketing tech brands emerge.
But, for now, all you have to worry about is the tag that will let you track your video views.
Thankfully, finding this tag is pretty simple because it’s the first one on the list.
Select the Universal Analytics option and then start filling in some more details.
First, you’ll see an option that says “Track Type.”

By default, it will say “Page View.”
Go ahead and change that to “Event” since the variables and triggers we’ve set up work best in that category.
Once you do that, the options on your menu will change to look like this:

These parameters are what allow the tag to correctly attribute what action took place.
This is where all of those variables you just activated will come into the equation.
Go through each section and change them to look like this:
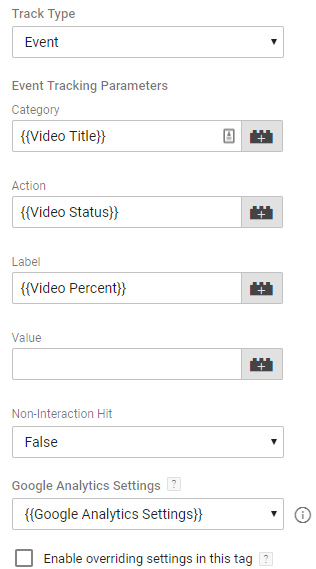
As you can see, under “Category,” I put .
For “Action,” I used .
And then for “Label,” I used the variable.
You can change these to suit your needs. But if you just want to track your video views, then go ahead and mimic these settings.
You’ll also need to set up your Google Analytics settings so that it includes your tracking ID.
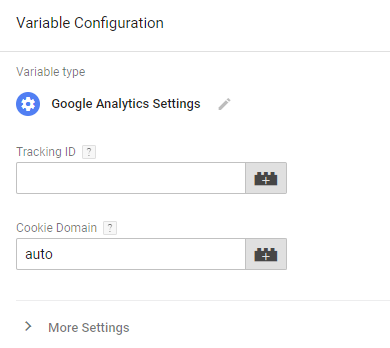
Even though you’ll probably have Google Tag Manager set up with the same account as your Google Analytics, you’ll still need to type in your tracking ID here. This is what allows the trigger to send information to Google Analytics.
If you don’t set this up correctly, then the trigger won’t communicate the information to Google Analytics when a user carries out the specified action.
Make sure that this is accurate before you move on so that you aren’t wasting your effort.
Once you select everything, you can save your settings.
Your menu should look something like this:
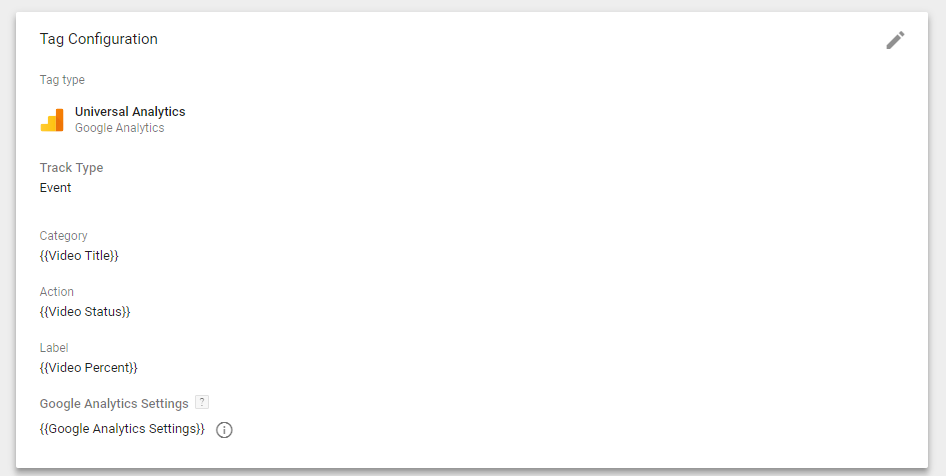
Once you set everything up perfectly, save your tag configuration and move on to triggering selection.

Since you’ve already set up your triggers, all you have to do is select the ones that you want to include with this particular tag.
You can also add an exception if you want to, but this would require you to create another trigger.
But at this point, you’ve completed everything you need.
Now, it’s time to test your tag.
Start by clicking on the “Preview” tab at the top right of Google Tag Manager. Then, navigate to a URL on your site that has video.
You should see a debug pane popup that looks like this:
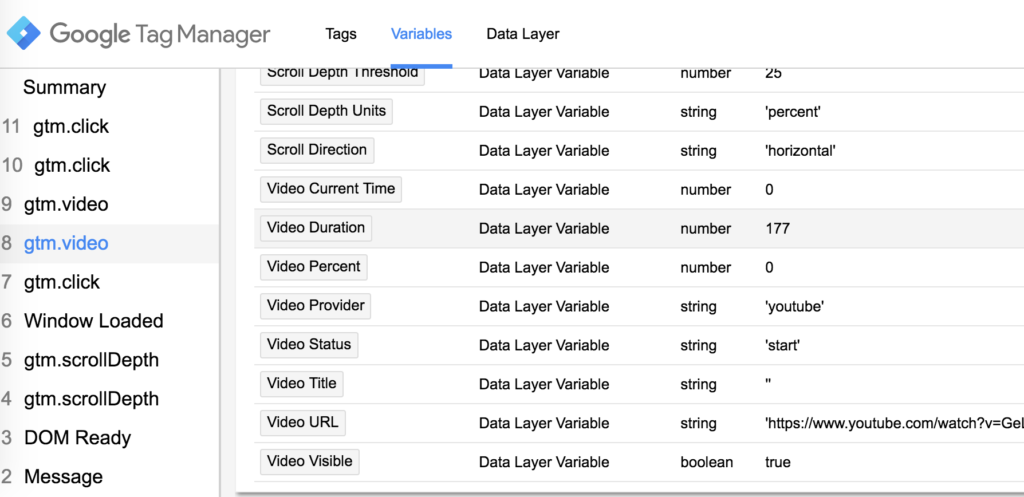
If you see your tags firing and data populating your debug pane, you’re in business.
Go ahead and double-check that everything is where you want it. Then publish your tag.
Step #4: Check out your data in Google Analytics
At this point, everything should be running smoothly for Google Tag Manager.
Whenever a user clicks to watch your video, the tag you’ve created will register a hit and update your metrics accordingly.
But if you look through Google Tag Manager, you’ll notice that there are no native analytics on the platform.
You’ll have to head over to your Google Analytics account to see what’s happening.
Just keep in mind that it may take a little while for the results to start pouring in.
After all, you need traffic in order to catch analytics.
So, to start tracking your video views, you’ll need to set up a custom metric in your Analytics.
To do that, go to the “Admin” tab in your Analytics and locate the “Property” options.
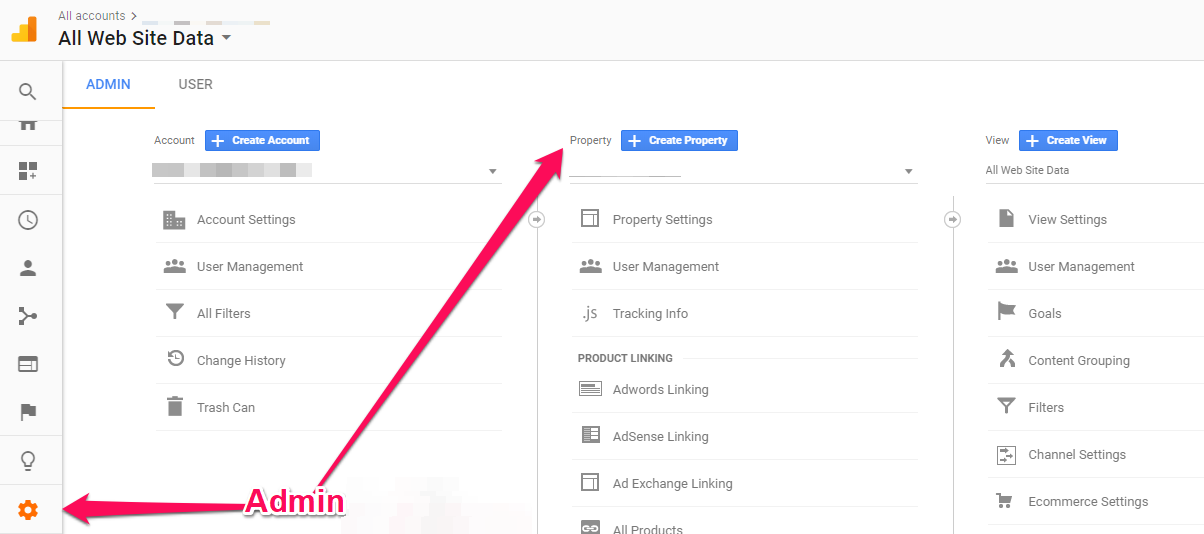
When you find the right menu, scroll down and select the “Custom Metrics” option under the “Custom Definitions” tab.
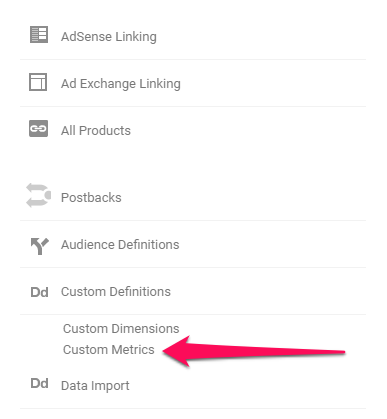
Select the option for creating a new custom metric.

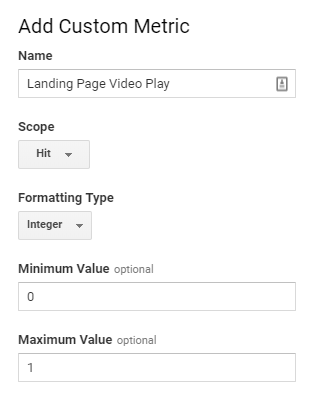
Then, create a new “hit” scope metric using the integer formatting type and minimum/maximum values of zero and one. It should look like this:
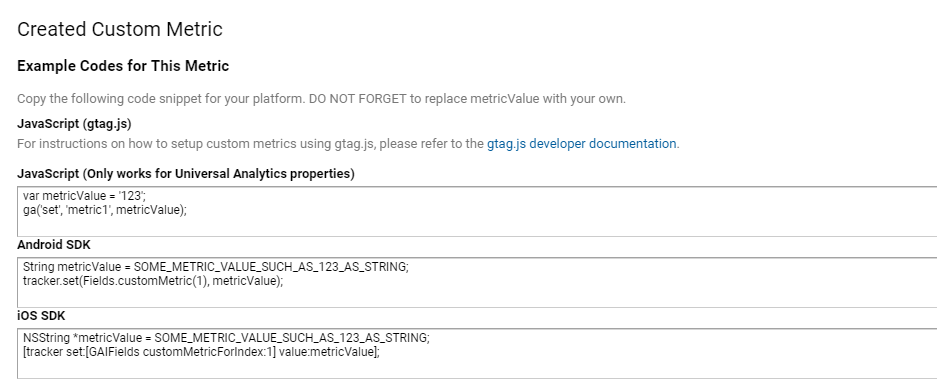
It will give you a snippet of code that you’ll need to install on your landing page along with the tag.
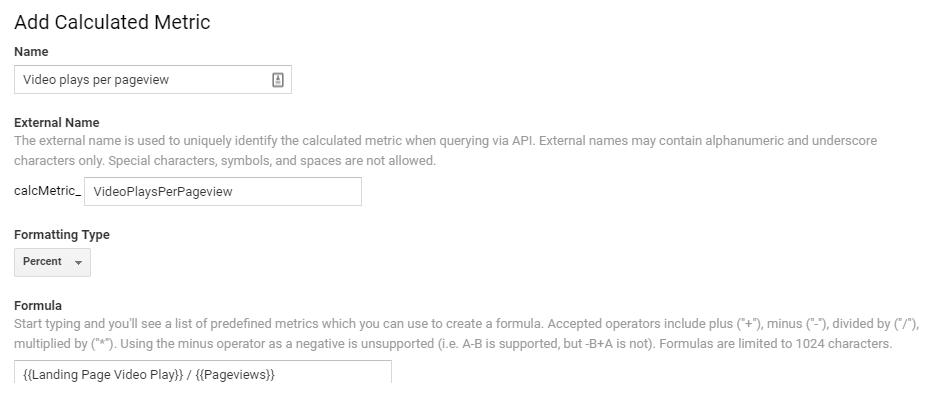
It’s also a good idea to create a custom metric if you want to see information like how many video plays per pageview you get.
To do that, you’ll need to go back to your “Admin” tab and create a custom metric under the “View” section.
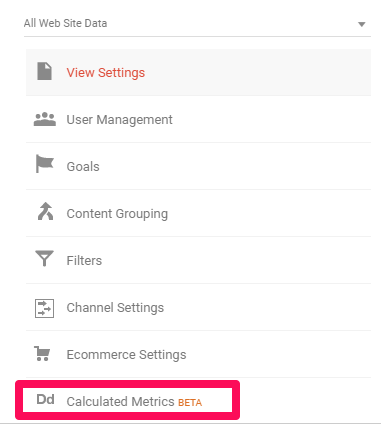
From there, you’ll add a new calculated metric according to the information you want to track.
In this example, we’re trying to see the ratio of video starts to pageviews. So, you’ll need to change the formatting type to percent and add a formula that divides video plays by pageviews.
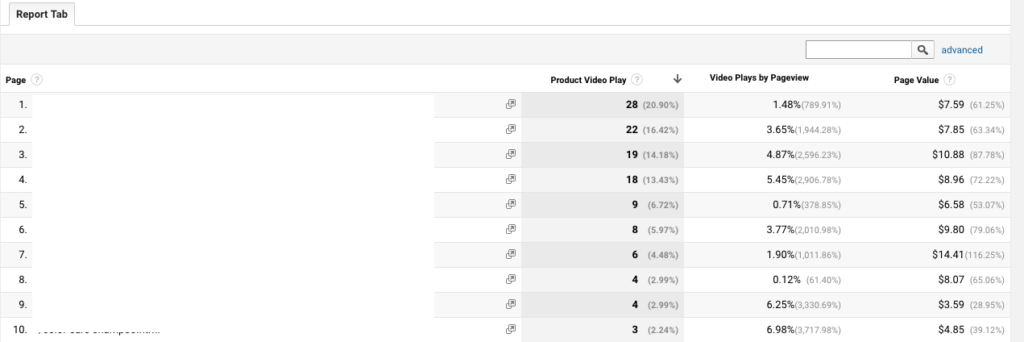
You’ll now be able to gather actionable data that allows you to quickly analyze your video’s performance.
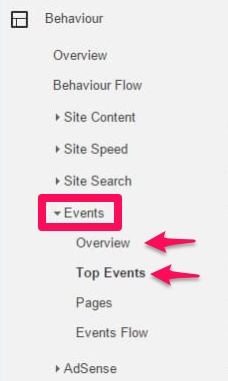
You can also set up your Google Tag Manager to send information to the “Events” option under the “Behavior” tab. You can either select the “Overview” option or click on “Top Events.” Either will give you the information you’re looking for.
Click on the “Event Category” list and find the data you’ve been tracking.
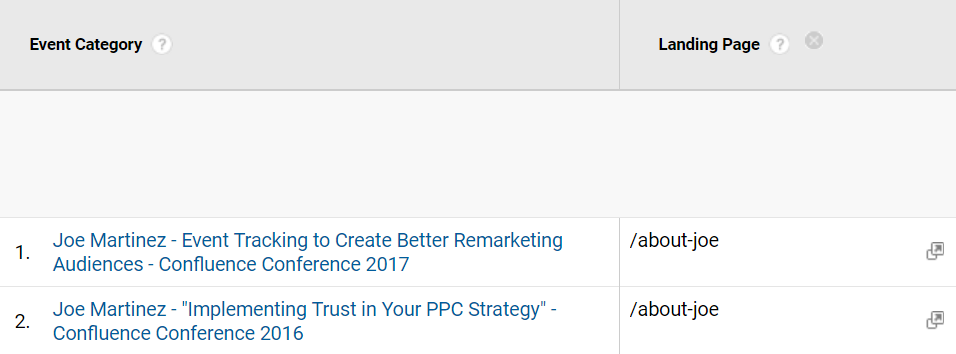
Once you find your data, you may need to click on the “Secondary dimension” option and look for landing pages.
If your Analytics isn’t already showing this, adding the landing page option will allow you to see the URL and the actions that users have taken on it.

At this point, you’ve completed your setup of Google Tag Manager and found the data you need.
You can now see how much interaction your video is receiving and how long users are watching your videos for.
Use this information to make informed decisions about how you can further optimize your landing page video.
With trial and error, you can create a trackable landing page that helps you convert more and provide higher revenue for your business.
Conclusion
Landing pages are a proven way to help you grow your brand and sell your product or service on the Internet.
Finding a way to incorporate a video on your landing pages could be one of the best moves you make this year, and there’s plenty of reasons why.
A video is more engaging, converts more, and even helps your viewers retain information better than they would with text alone.
But when it comes to tracking the performance of videos on a landing page, many businesses fall short.
Less than half move beyond the basics, which means that they don’t know what’s happening on the page.
In order to help you dive deeper into your video’s performance, you need to start using Google Tag Manager.
Google Tag Manager allows you to set up bits of code on your site that alert third-party tracking systems about user behavior.
The setup process has a bit of a learning curve. But once you learn the basics, it should only take you a few minutes to set it up so you can track the data you need.
You can set up triggers, variables, and your tags in a way that tells your Google Analytics if visitors are watching your videos.
If you set up more than one trigger, you can even tell how much of a video your users watch before they move on and complete a different action.
By following the steps outlined above, you’ll have actionable data that lets you make informed decisions when you’re optimizing your landing page.
You can use that data to help you get more conversions and more revenue in the long run.
What have you used Google Tag Manager for on your site?
The post How To Use The Google Tag Manager To Track Video Views on Your Landing Pages appeared first on Neil Patel.
from Neil Patel https://ift.tt/2GOTbdW
No comments